本文转载自: OpenFPGA微信公众号

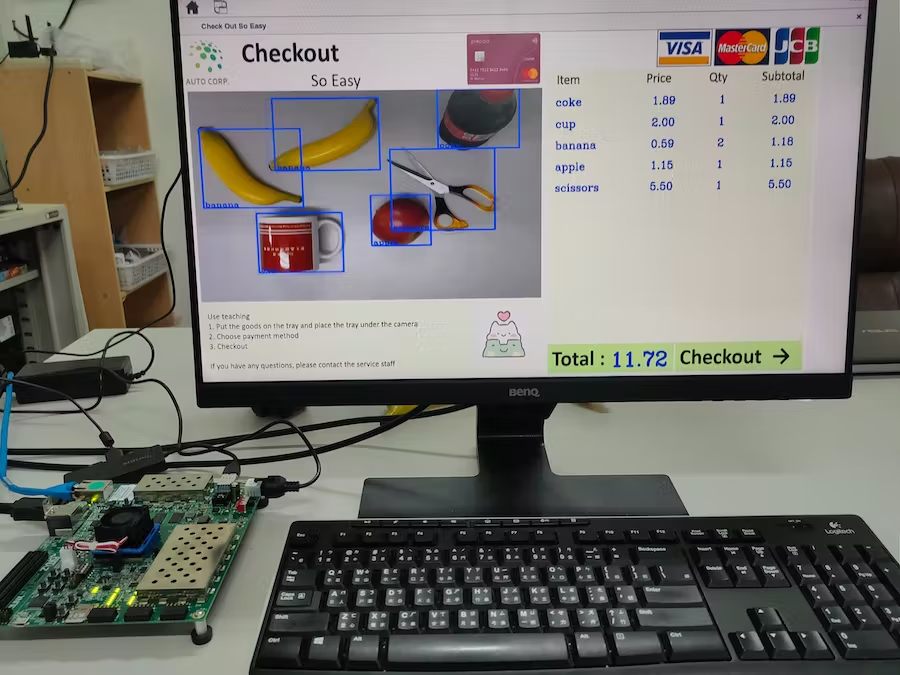
整个系统是以DPU为核心,在 DPU 上部署对象检测模型实现实时智能检测,该系统视频输入可以来自 VCU 解码的视频或来自相机的实时视频图像。

介绍
Checkout So Easy 是本次介绍的项目系统名称。是在ultrascale+上利用 VCU 和 DPU 实现的智能零售系统。
Checkout So Easy 有两种应用场景:
1.Checkout So Easy充当云端
将记录商品的视频以 mp4 等格式的视频发送到系统。借助Checkout So Easy的VCU解码器进行解码,我们将解码后的视频帧送入DPU计算商品价格。商品详情、价格、图像检测视频等结果将显示在显示器上。
Checkout So Easy 发挥优势
商品信息是从连接到 FPGA 的摄像头捕获的。摄像头拍摄的图像将送入DPU计算商品的结果,并将详细信息显示在显示器上。与场景 1 不同的是,监视器上的结果将逐帧记录。借助 VCU 编码器,我们可以存储由帧组成的视频。当一些交易纠纷发生时,我们可以查看交易的整个过程。
如何重新创建此项目
第 一 步:构建和设置 FPGA 板的环境
https://github.com/alex0620ee05/Self-checkout-system/blob/main/Build_sdcard
构建步骤:
1.克隆完整的存储库(包括子仓库)
$ git clone --recurse-submodules $ git clone --recurse-submodules https://github.com/Xilinx/Vitis-In-Depth-Tutorial
$ cd Vitis-In-Depth-Tutorial/Runtime_and_System_Optimization/Design_Tutorials/02-ivas-ml/
注意:需要安装 Vitis 补丁:
此设计具有较大的 rootfs,并且 Vitis 2020.1 在打包超过 2GB 的 ext4 分区的 SD 卡映像时存在问题。此补丁更改了打包流程,将初始 rootfs 大小四舍五入为 ext4 分区512MB大小的第一个完整倍数。安装它:
$ cp ./vitis_patch/mkfsImage.sh ${XILINX_VITIS}/scripts/vitis/util
2.Vitis2020.1、PetaLinux2020.1和XRT2020.1源码
$ source ${XILINX_VITIS}/settings64.sh
$ source ${XILINX_PetaLinux}/settings.sh
$ source ${XILINX_XRT}/setup.sh
3.搭建硬件平台
$ cd platform/dev/zcu104_vcu
$ make
petalinux-config kernel、petalinux-build、petalinux-build --sdk时可能会出现错误。此时应该正确修改platform/dev/zcu104_vcu 和 platform/dev/zcu104_vcu/petalinux中的Makefile并重新执行出错的命令make 。
4.构建Vitis设计(添加DPU ip)
必须一次且仅一次,将 hw_src 目录中的补丁应用到 Vitis Vision 库。
$ cd ../../../hw_src/Vitis_Libraries
$ patch -p1 < ../vision_lib_area_resize_ii_fix.patch
$ cd ..
$ cp ../../../../../dpu_conf_zcu104.vh .
$ cp ../../../../../zcu10x_config .
$ make
5.获取SD卡镜像
第一步:将上面获取到的sd_card.img放入sd_card_zcu104/.
或者,可以下载预构建的sd_card.img(https://github.com/alex0620ee05/Self-checkout-system/tree/main/prebuilt/sd_card_image)
第二步:为 Vitis AI 库 v1.2 准备 SD 卡
https://github.com/alex0620ee05/Self-checkout-system/tree/main/set_up_files
本节以下所有步骤均针对目标(ZCU104板)
将以下文件放入/home/root/目录:
jsons/
scripts/
test_data/
.bashrc
debug.ini
将以下文件放入 /:
1.update.tar.gz
调整 rootfs 的大小:
cd /home/root/scripts
sh ext4_auto_resize.sh
2.安装依赖和Vitis AI v1.2库
以下步骤需要开发板可联网(脚本使用wget下载)
cd /home/root/scripts
sh update.sh
sh install_vai.sh
第三步:Vitis-AI量化编译
https://github.com/alex0620ee05/Self-checkout-system/tree/main/host
编译好的文件ssd_mobilenet_v2_coco_tf.elf已经在demo/,可以跳过这一步,直接使用提供的文件。
1.搭建Vitis-AI环境
按照Vitis-AI上的步骤构建 docker。
./docker_run.sh xilinx/vitis-ai-gpu:latest
2.从Xilinx AI model zoo下载tensorflow模型
只下载.pb文件,运行sh download_deploy_model.sh即可,此步可以跳过后面的说明。
也可以按照Xilinx/Vitis-AI/AI-Model-Zoo上的说明获取模型。
在我们的项目中,我们使用xilinx_model_sample/tf_ssdmobilenetv2_coco_300_300_3.75G作为我们的对象检测模型。
复制xilinx_model_sample/tf_ssdmobilenetv2_coco_300_300_3.75G/quantized/deploy_model.pb到host/ssd_mobilenet/.
3.编译tensorflow模型
执行./ssdmobilenet_compile_b4096.sh后,就会得到dpu_ssd_mobilenet_v2_coco_tf.elf
第 四 步:交叉编译DPU推理代码
http://github.com/alex0620ee05/Self-checkout-system/tree/main/Vitis-AI/V...
编译好的文件tfssdtest.so已经在demo/,可以跳过这一步,直接使用提供的文件。
1.设置主机
按照Xilinx/Vitis-AI-Library(https://github.com/Xilinx/Vitis-AI/tree/master/Vitis-AI-Library)上的步骤操作
2.交叉编译
运行./build_final.sh,你会得到一个编译后的文件 tfssdtest.so(64位LSB共享对象,ARM aarch64格式)。
将编译后的文件复制到demo/
下一步
第 五 步:在自己板卡上评估这个项目
https://github.com/alex0620ee05/Self-checkout-system/tree/main/demo
以下步骤针对目标(ZCU104):
如果所有设置都完成,将demo/目录放入/home/root/.
1.修改显示分辨率
sh set_monitor.sh
2. 执行自助结账系统演示
需要使用sd_card.img在vcu_decode/
带摄像头的实时结账系统:
python3 DEMO.py -c True
带有视频源的结帐系统:
python3 DEMO.py -v
参考
Xilinx Vitis-AI quantizer & compiler / Xilinx Vitis-Ai-Library :
https://github.com/Xilinx/Vitis-AI
Xilinx Vitis Tutorial :
https://github.com/Xilinx/Vitis-In-Depth-Tutorial/tree/master/Runtime_an...
Checkout So Easy - Real-time Smart Retail System For FPGA :
https://www.hackster.io/maax/checkout-so-easy-real-time-smart-retail-sys...
总结
上面步骤需要的所有文件都有链接,链接都是开源的。完整的项目是运行在ZCU104官方板卡上,项目的完整链接如下:
https://github.com/alex0620ee05
当然按照上面的步骤,在自己的开发板上复现难度也是不大的~