作者:OpenSLee
1 背景知识
电子相册的实现就是通过按键来改变显示器的图片轮换。本节将通过ps端的按键来控制ARM选择不同的图片通过HDMI输出到显示屏。
1.1 AXI_VDMA的介绍
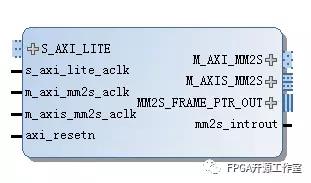
Xilinx的AXI VDMA(Video Direct Memory Access)核是个软核。它提供了高带宽的直接内存存取在内存和支持AXI4-Stream video的目标互联。如下图所示既是一个axi_vdma IP。
如下图所示,它是AXI VDMA结构框图。
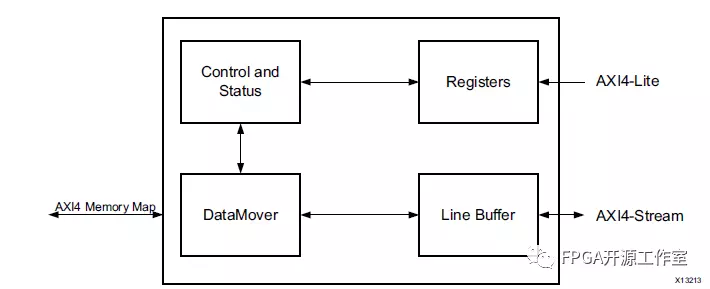
当Registers通过AXI4-Lite接口被编程,Control/Status模块产生适当的合适命令去DataMover模块,DataMover模块初始化读和写命令在AXI4 Master接口上。
一个可配置的异步行缓冲区用于在之前临时保存像素数据把它写在AXI4 Memory Map接口或AXI4-Stream接口上。
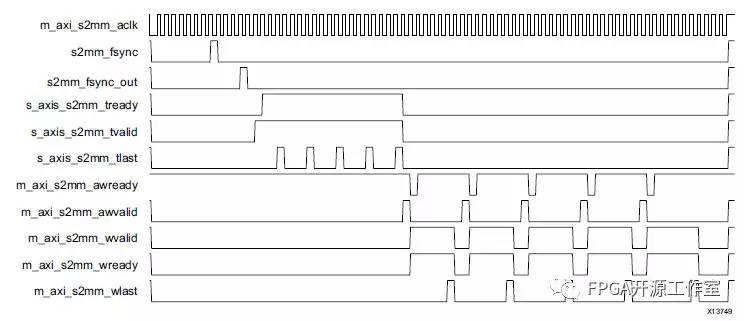
在写路径中,AXI VDMA接受AXI4-stream slave接口的帧使用AXI4 Master接口将其写到系统内存中。
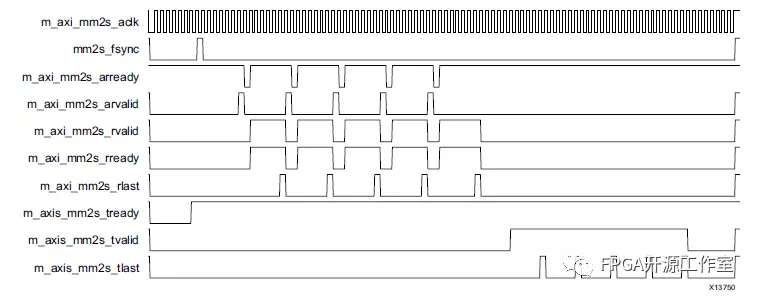
在读路径中,AXI VDMA使用AXI4 Master接口从系统内存读帧和输出在AXI4-Stream Master接口上。
Read (MM2S) Path Timing
Write(S2MM) Path Timing
1.2 V-tc模块的介绍
V_tc(Video Timing Controller) IP 主要用来产生显示器输出所需的时序信号。IP模块如下图所示。

1.3 AXI4-Stream to Video Out IP 的介绍
该模块主要是将AXI4-stream 转换为视频输出模块。模块图如下。

2 电子相册的实现
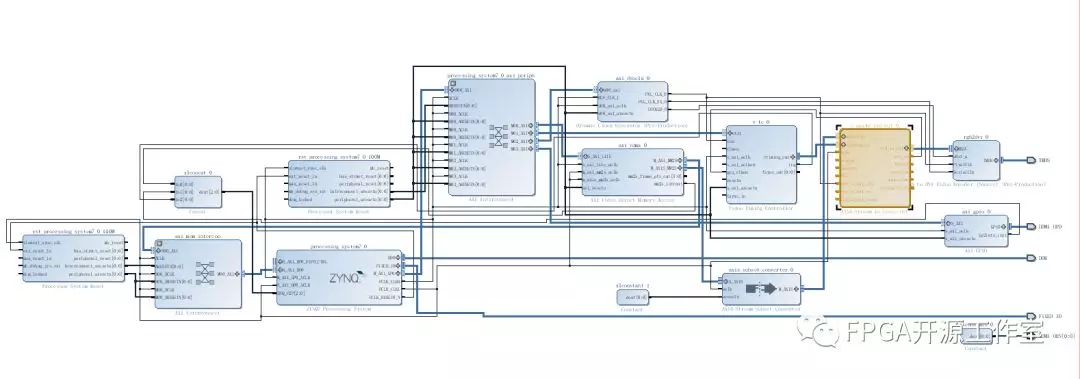
整个模块图如上图所示。对于工程的创建在此不再赘述。可参考《Zynq-7000 ARM端helloworld实验》。
1) ZYNQ7 Processing System 的设置
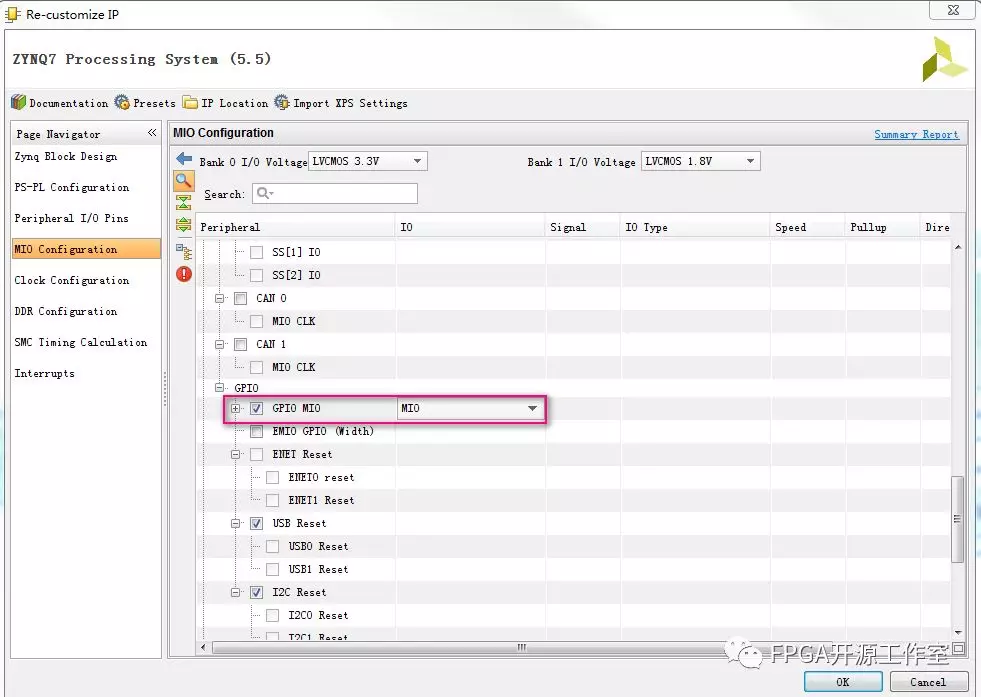
为了使用PS端的按键我们勾选GPIO MIO如下图所示。
为了与DDR3通信我们勾选HP0接口。

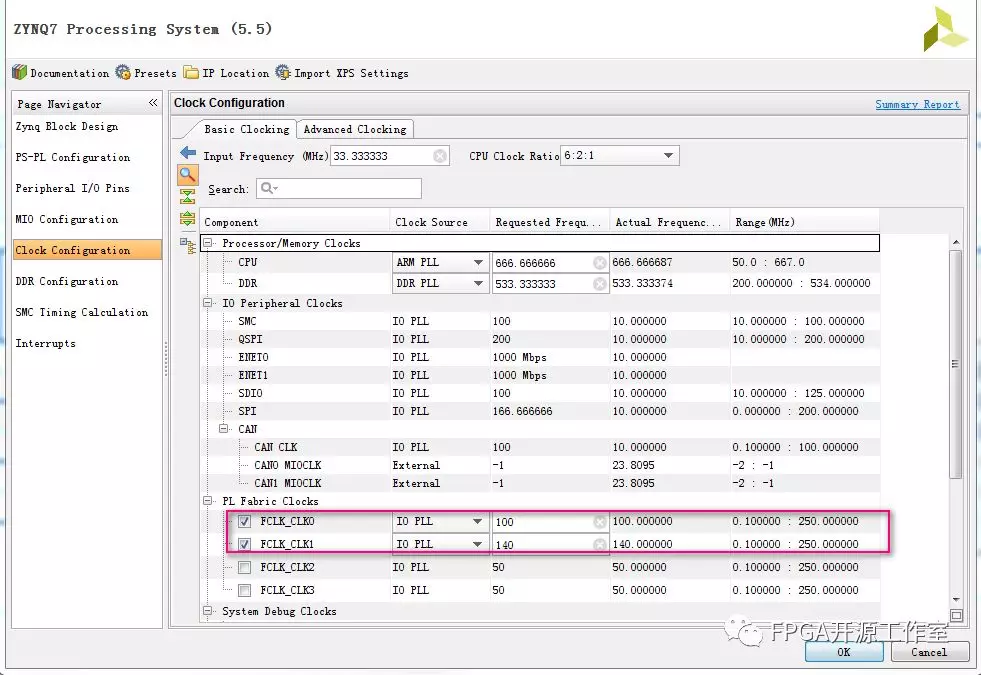
时钟配置如下
2) VDMA的配置
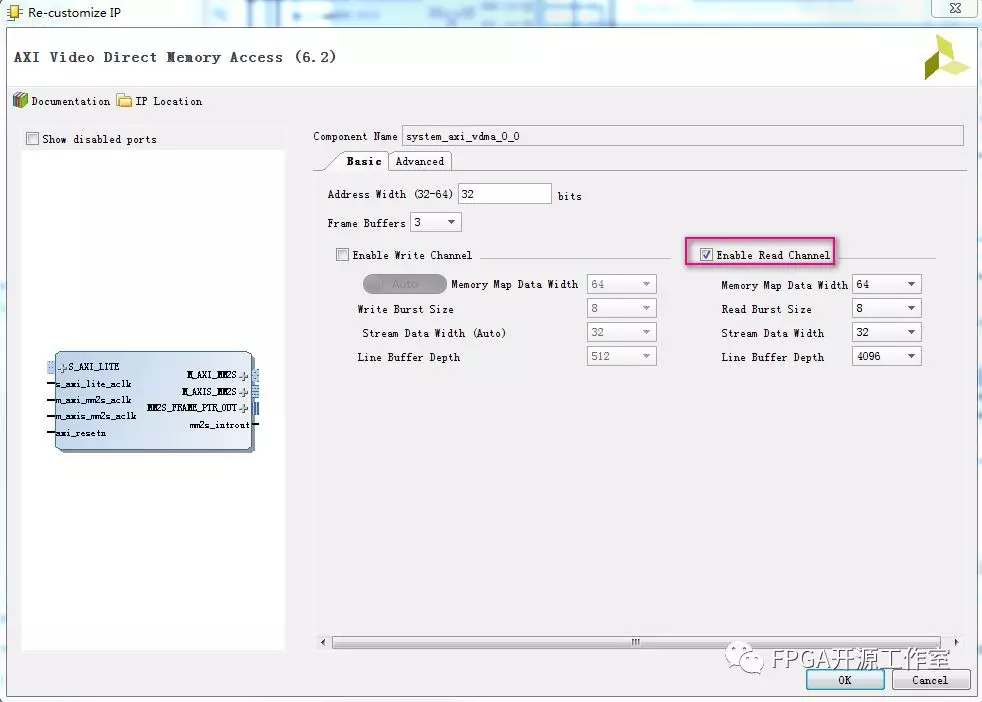
VDMA的配置如下图所示,因为没有用到视频的输入所以在这里不需要选择写通道。
其他模块的配置和使用在此不再赘述,需要源工程的可以联系FPGA开源工作室。
3) launch SDK
(1)首先选中system右键选中Generate Output Products...
(2)选中system右键选中Create HDL Wrapper...
(3)建立约束文件XDC
(4)生成bitstream。
(5)导出硬件 选择菜单File->Export->Export Hardware...。这里包括bitstream
(6)Launch SDK 选择菜单File->Launch SDK,启动SDK环境。
4)SDK编程
新建APP也在此不再赘述。
图片的制作:
从网上下载800*600的图片,使用img2lcd工具设置如下。
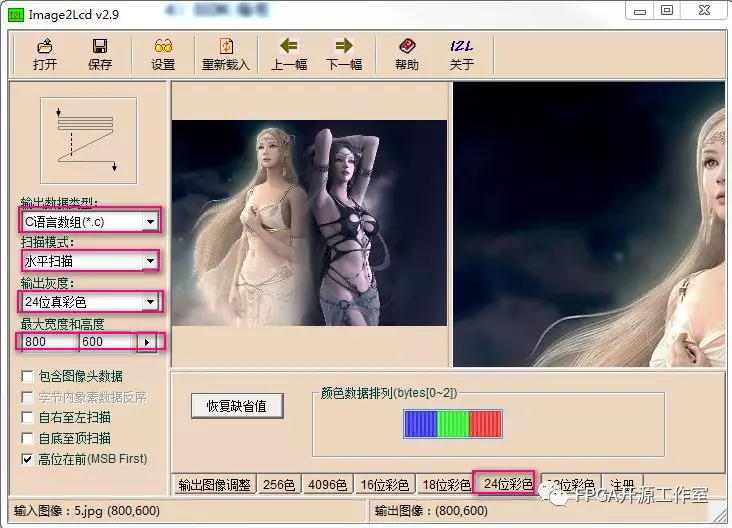
主程序如下所示:
/* ------------------------------------------------------------ */
/*Include File Definitions*/
/* ------------------------------------------------------------ */
#include "display_demo.h"
#include "display_ctrl/display_ctrl.h"
#include
#include "math.h"
#include
#include
#include "xil_types.h"
#include "xil_cache.h"
#include "xparameters.h"
#include "pic_800_600.h"
#include "pic1_800_600.h"
#include "pic2_800_600.h"
#include "pic3_800_600.h"
#include "pic4_800_600.h"
#include "xgpiops.h"
#include "sleep.h"
#include "xil_printf.h"
#include "stdio.h"
/*
* XPAR redefines
*/
#define DYNCLK_BASEADDR XPAR_AXI_DYNCLK_0_BASEADDR
#define VGA_VDMA_ID XPAR_AXIVDMA_0_DEVICE_ID
#define DISP_VTC_ID XPAR_VTC_0_DEVICE_ID
#define VID_VTC_IRPT_ID XPS_FPGA3_INT_ID
#define VID_GPIO_IRPT_ID XPS_FPGA4_INT_ID
#define SCU_TIMER_ID XPAR_SCUTIMER_DEVICE_ID
#define UART_BASEADDR XPAR_PS7_UART_1_BASEADDR
/* ------------------------------------------------------------ */
/*Global Variables*/
/* ------------------------------------------------------------ */
/*
* Display Driver structs
*/
DisplayCtrl dispCtrl;
XAxiVdma vdma;
/*
* Framebuffers for video data
*/
u8 frameBuf[DISPLAY_NUM_FRAMES][DEMO_MAX_FRAME] __attribute__ ((aligned(64)));
u8 *pFrames[DISPLAY_NUM_FRAMES]; //array of pointers to the frame buffers
/* ------------------------------------------------------------ */
/*Procedure Definitions*/
/* ------------------------------------------------------------ */
int main(void)
{
int Status;
XAxiVdma_Config *vdmaConfig;
int i;
static XGpioPs psGpioInstancePtr;
XGpioPs_Config* GpioConfigPtr;
int xStatus;
int MIO_Led0 = 0; //MIO0_LED
int MIO_Led1 = 13; //MIO13_LED
int MIO_Key0 = 50; //MIO0_LED
int MIO_Key1 = 51; //MIO13_LED
u32 Pin_out = 0x1;//1表示输出,0表示输入
u32 Pin_in = 0x0;//1表示输出,0表示输入
int key0,key1;
int counter = 0;
//--MIO的初始化
GpioConfigPtr = XGpioPs_LookupConfig(XPAR_PS7_GPIO_0_DEVICE_ID);
if(GpioConfigPtr == NULL)
return XST_FAILURE;
xStatus = XGpioPs_CfgInitialize(&psGpioInstancePtr,GpioConfigPtr, GpioConfigPtr->BaseAddr);
if(XST_SUCCESS != xStatus)
print(" PS GPIO INIT FAILED \n\r");
//--MIO的输入输出操作
XGpioPs_SetDirectionPin(&psGpioInstancePtr, MIO_Led0,Pin_out);//配置MIO输出方向
XGpioPs_SetOutputEnablePin(&psGpioInstancePtr, MIO_Led0,1);//配置MIO的第0位输出
XGpioPs_SetDirectionPin(&psGpioInstancePtr, MIO_Led1,Pin_out);//配置MIO输出方向
XGpioPs_SetOutputEnablePin(&psGpioInstancePtr, MIO_Led1,1);//配置MIO的第0位输出
XGpioPs_SetDirectionPin(&psGpioInstancePtr, MIO_Key0,Pin_in);//配置MIO输出方向
XGpioPs_SetOutputEnablePin(&psGpioInstancePtr, MIO_Key0,1);//配置MIO的第0位输出
XGpioPs_SetDirectionPin(&psGpioInstancePtr, MIO_Key1,Pin_in);//配置MIO输出方向
XGpioPs_SetOutputEnablePin(&psGpioInstancePtr, MIO_Key1,1);//配置MIO的第0位输出
/*
* Initialize an array of pointers to the 3 frame buffers
*/
for (i = 0; i < DISPLAY_NUM_FRAMES; i++)
{
pFrames[i] = frameBuf[i];
}
/*
* Initialize VDMA driver
*/
vdmaConfig = XAxiVdma_LookupConfig(VGA_VDMA_ID);
if (!vdmaConfig)
{
xil_printf("No video DMA found for ID %d\r\n", VGA_VDMA_ID);
}
Status = XAxiVdma_CfgInitialize(&vdma, vdmaConfig, vdmaConfig->BaseAddress);
if (Status != XST_SUCCESS)
{
xil_printf("VDMA Configuration Initialization failed %d\r\n", Status);
}
/*
* Initialize the Display controller and start it
*/
Status = DisplayInitialize(&dispCtrl, &vdma, DISP_VTC_ID, DYNCLK_BASEADDR, pFrames, DEMO_STRIDE);
if (Status != XST_SUCCESS)
{
xil_printf("Display Ctrl initialization failed during demo initialization%d\r\n", Status);
}
Status = DisplayStart(&dispCtrl);
if (Status != XST_SUCCESS)
{
xil_printf("Couldn't start display during demo initialization%d\r\n", Status);
}
while(1){
sleep(1);//延时
key0 = XGpioPs_ReadPin(&psGpioInstancePtr, MIO_Key0);
if(key0 == 0){
usleep(20000);
xil_printf("key0 down\n");
if(key0 == 0){
XGpioPs_WritePin(&psGpioInstancePtr, MIO_Led0, 0);
counter = counter+1;
if(counter == 5)
counter = 0;
sleep(2);
XGpioPs_WritePin(&psGpioInstancePtr, MIO_Led0, 1);
}
}
DemoPrintTest(dispCtrl.framePtr[dispCtrl.curFrame], dispCtrl.vMode.width, dispCtrl.vMode.height, dispCtrl.stride, counter);
}
return 0;
}
void DemoPrintTest(u8 *frame, u32 width, u32 height, u32 stride, int pattern)
{
u32 xcoi, ycoi;
u32 iPixelAddr = 0;
u8 wRed, wBlue, wGreen;
u32 xInt;
u32 pic_number=0;
switch (pattern)
{
case DEMO_PATTERN_0:
for(ycoi = 0; ycoi < height; ycoi++)
{
for(xcoi = 0; xcoi < (width * 4); xcoi+=4)
{
frame[xcoi + iPixelAddr + 0] = gImage_pic_800_600[pic_number++];
frame[xcoi + iPixelAddr + 1] = gImage_pic_800_600[pic_number++];
frame[xcoi + iPixelAddr + 2] = gImage_pic_800_600[pic_number++];
}
iPixelAddr += stride;
}
/*
* Flush the framebuffer memory range to ensure changes are written to the
* actual memory, and therefore accessible by the VDMA.
*/
Xil_DCacheFlushRange((unsigned int) frame, DEMO_MAX_FRAME);
break;
case DEMO_PATTERN_1:
for(ycoi = 0; ycoi < height; ycoi++)
{
for(xcoi = 0; xcoi < (width * 4); xcoi+=4)
{
frame[xcoi + iPixelAddr + 0] = gImage_pic1_800_600[pic_number++];
frame[xcoi + iPixelAddr + 1] = gImage_pic1_800_600[pic_number++];
frame[xcoi + iPixelAddr + 2] = gImage_pic1_800_600[pic_number++];
}
iPixelAddr += stride;
}
/*
* Flush the framebuffer memory range to ensure changes are written to the
* actual memory, and therefore accessible by the VDMA.
*/
Xil_DCacheFlushRange((unsigned int) frame, DEMO_MAX_FRAME);
break;
case DEMO_PATTERN_2:
for(ycoi = 0; ycoi < height; ycoi++)
{
for(xcoi = 0; xcoi < (width * 4); xcoi+=4)
{
frame[xcoi + iPixelAddr + 0] = gImage_pic2_800_600[pic_number++];
frame[xcoi + iPixelAddr + 1] = gImage_pic2_800_600[pic_number++];
frame[xcoi + iPixelAddr + 2] = gImage_pic2_800_600[pic_number++];
}
iPixelAddr += stride;
}
/*
* Flush the framebuffer memory range to ensure changes are written to the
* actual memory, and therefore accessible by the VDMA.
*/
Xil_DCacheFlushRange((unsigned int) frame, DEMO_MAX_FRAME);
break;
case DEMO_PATTERN_3:
for(ycoi = 0; ycoi < height; ycoi++)
{
for(xcoi = 0; xcoi < (width * 4); xcoi+=4)
{
frame[xcoi + iPixelAddr + 0] = gImage_pic3_800_600[pic_number++];
frame[xcoi + iPixelAddr + 1] = gImage_pic3_800_600[pic_number++];
frame[xcoi + iPixelAddr + 2] = gImage_pic3_800_600[pic_number++];
}
iPixelAddr += stride;
}
/*
* Flush the framebuffer memory range to ensure changes are written to the
* actual memory, and therefore accessible by the VDMA.
*/
Xil_DCacheFlushRange((unsigned int) frame, DEMO_MAX_FRAME);
break;
case DEMO_PATTERN_4:
for(ycoi = 0; ycoi < height; ycoi++)
{
for(xcoi = 0; xcoi < (width * 4); xcoi+=4)
{
frame[xcoi + iPixelAddr + 0] = gImage_pic4_800_600[pic_number++];
frame[xcoi + iPixelAddr + 1] = gImage_pic4_800_600[pic_number++];
frame[xcoi + iPixelAddr + 2] = gImage_pic4_800_600[pic_number++];
}
iPixelAddr += stride;
}
/*
* Flush the framebuffer memory range to ensure changes are written to the
* actual memory, and therefore accessible by the VDMA.
*/
Xil_DCacheFlushRange((unsigned int) frame, DEMO_MAX_FRAME);
break;
default :xil_printf("Error: invalid pattern passed to DemoPrintTest\n");
}
}
5)下载实现
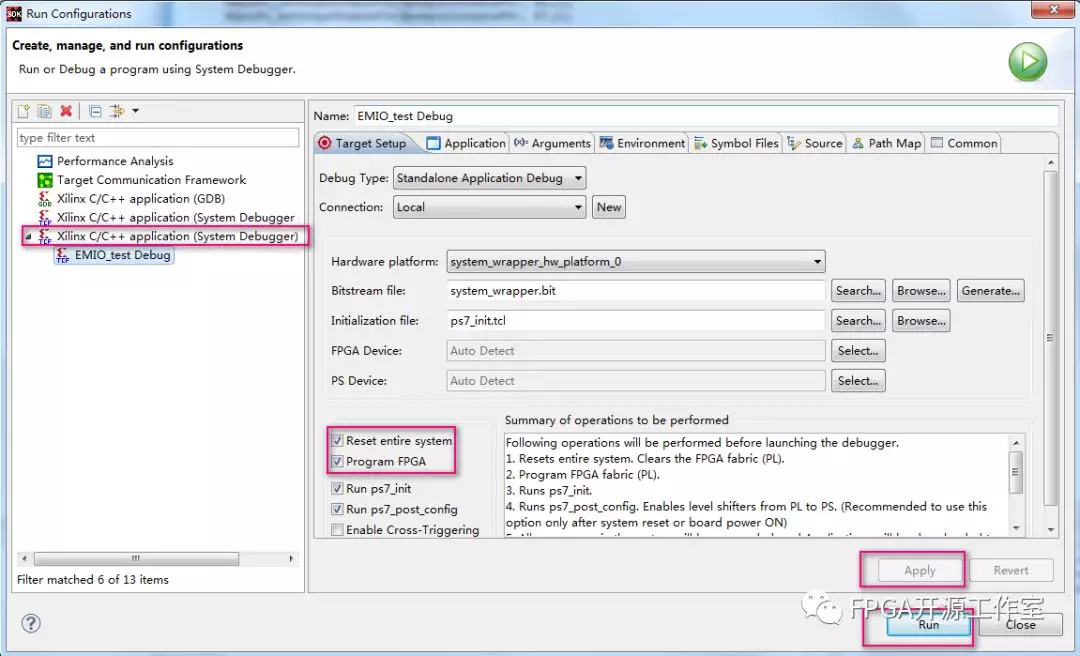
连接好硬件后,右键选择EMIO_test工程,再选择Run as->Run Configurations...。双击xilinx C/C++ application (System Debugger) >>勾选Reset entire system和Program FPGA>>Apply>>Run如下图所示。
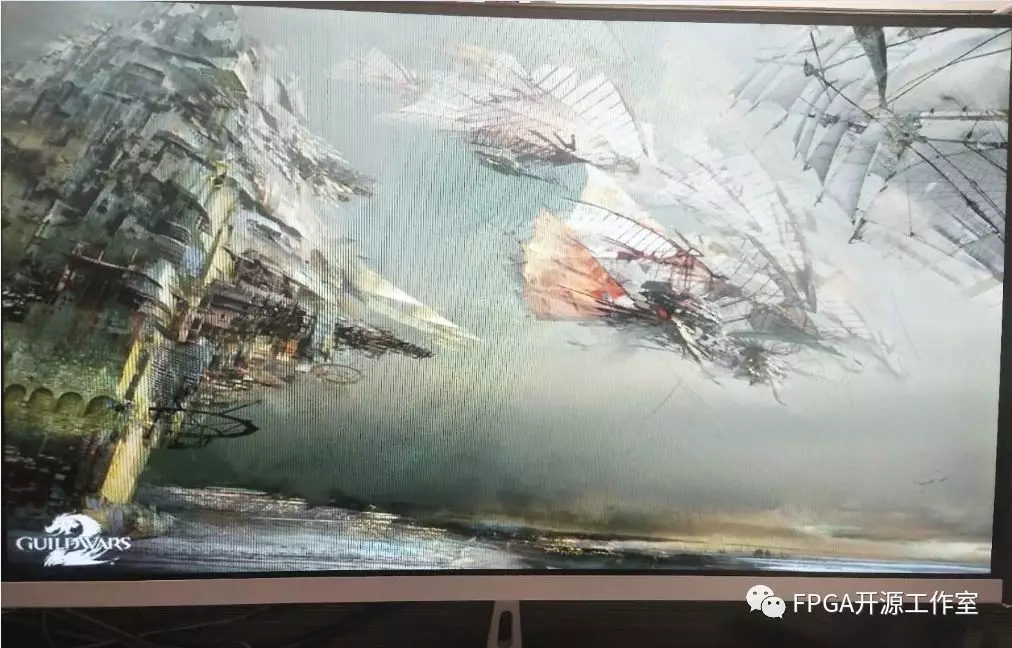
6)结果展示:

视频欣赏:
总结:
本节涉及到的内容比较多,使用到了很多与视频图像相关的IP,也为后期的图像采集系统打下了基础。
本文转载自: FPGA开源工作室