作者:Aravind Babu,AMD开发者;文章来源:AMD开发者社区
本篇博文承接第 1 部分使用 PetaLinux 的先决条件指南中探讨的先决条件,继续展开话题。
此处提供了完整的指南,讲述如何在根文件系统 (rootfs) 中添加自定义配方和层以及如何在其中包含多个程序包。
向 PetaLinux 添加自定义层
1.下载 Meta-Example 层:
首先,您需要将 meta-example 层下载到自己的主机上。该层提供了 3 个构建配方:bbexample、bbexample-rt 和 bbexample-lt,这 3 个配方分别从不同位置提取源代码。
$ git clone https://github.com/DynamicDevices/meta-example
关于 Meta-Example 层:
bbexample:此配方会从 git 树中提取源代码。
bbexample-rt:此配方会从远程 tar 文件中提取源代码。
bbexample-lt:此配方会从本地 tar 文件中提取源代码。
2.配置层路径:
下一步,您需要在 PetaLinux 构建系统中配置层路径。此操作可使用 petalinux-config 命令或者手动编辑 conf/bblayers.conf 文件来完成。
使用 petalinux-config:
cd <plnx-proj-root>
petalinux-config
导航到:Yocto Settings --> User Layers --> (/absolute_path_to_meta_layer/meta-example) user layer 0
手动编辑 conf/bblayers.conf:
cd <plnx-proj-root>/build
vim conf/bblayers.conf
将层路径添加到 BBLAYERS:
BBLAYERS := " \
  ${SDKBASEMETAPATH}/layers/poky/meta \
  ${SDKBASEMETAPATH}/layers/poky/meta-poky \
  /absolute_path_to_meta_layer/meta-example \
"
3 . 构建 Meta-Layer 示例包:
要构建 meta-layer 示例包,请使用以下命令:
$ petalinux-build -c bbexample-lt
认识配方变量:
SRC_URI:该变量是空格分隔的 URI 列表,用于从 git、本地绝对路径、https、ftp 等来源下载源代码、补丁和其他文件。
PN:表示“Package Name”(包名称)。该变量的值是由 BitBake 根据配方文件的基本名称衍生所得的。
PV:表示“Package Version”(包版本)。该值是由 BitBake 根据配方文件的基本名称衍生所得的。
bbexample-lt 的示例配方内容:
SRC_URI = "file://bbexample-${PV}.tar.gz"在 Rootfs 中包含 Meta-Layer 构建输出
1.编辑配置文件:
根据 PetaLinux 版本,您需要编辑配置文件,以便在根文件系统中包含构建的包。
对于 PetaLinux 2022.1 及更高版本:
IMAGE_INSTALL:append = " bbexample-lt"
对于更低版本:
IMAGE_INSTALL_append = " bbexample-lt"
2.使用 .bbappend 文件:
或者,您也可以创建 .bbappend 文件,将特定包添加到特定镜像中。通常认为这种做法更好。
在 recipes-core/images 目录下创建名为 core-image-minimal.bbappend 的文件,其中包含以下内容:
IMAGE_INSTALL += " bbexample-lt"
基于本地源文件存档来构建 meta-layer 示例包
bbexample-lt 配方当前使用以下变量:
1.SRC_URI:该变量是空格分隔的 URI 列表,用于从 git、本地绝对路径、https、ftp 等来源下载源代码、补丁和其他文件。
2.PN 表示包名称。该变量的值是由 BitBake 根据配方文件的基本名称衍生所得的。
3.PV 表示包版本,它是由 BitBake 根据配方文件的基本名称衍生所得的
# Use local tarball
SRC_URI = "file://bbexample-${PV}.tar.gz"
可使用以下命令来调用 bbexample-lt 配方
$ petalinux-build -c bbexample-lt

[INFO] building bbexample-lt
[INFO] sourcing bitbake
INFO: bitbake bbexample-lt
Loading cache: 100% |###############################################################################################################################################################################| ETA:  00:00:00
Loaded 2941 entries from dependency cache.
Parsing recipes: 100% |#############################################################################################################################################################################| Time: 00:00:01
Parsing of 2328 .bb files complete (2294 cached, 34 parsed). 2943 targets, 196 skipped, 0 masked, 0 errors.
NOTE: Resolving any missing task queue dependencies
NOTE: Preparing RunQueue
NOTE: Checking sstate mirror object availability (for 38 objects)
NOTE: Executing SetScene Tasks
NOTE: Executing RunQueue Tasks
NOTE: Tasks Summary: Attempted 872 tasks of which 857 didn't need to be rerun and all succeeded.
INFO: Copying Images from deploy to images
[INFO] successfully built bbexample-lt
现在,您已成功构建了该层,但仍需要在根文件系统中包含生成的二进制文件。
有两种方法可用于在根文件系统中包含 meta-layer 示例构建输出:
1.为 PetaLinux 工程 <plnx-proj-root>/meta-user/conf/petalinuxbsp.conf 编辑您的工程文件 <BUILD_DIR>/conf/local.conf
# Use Below syntax For 2022.1 Release onwards
IMAGE_INSTALL:append = " bbexample-lt"

# Use Below syntax For 2021.2 and Old Releases
IMAGE_INSTALL_append = " bbexample-lt"
2.通过 .bbappend 将包添加到镜像中
您可能希望将特定的包添加到特定镜像中,通常认为这种做法更好。当前在此示例中,我们使用 core-image-minimal bitbake 配方来创建 core-image-minimal.bbappend 文件。
此 .bbappend 文件对原始 core-image-minimal 配方进行了扩展,目的是将层构建输出包含到 Linux 根文件系统中。
recipes-core/images/core-image-minimal.bbappend

core-image-minimal.bbappend file content
IMAGE_INSTALL += " bbexample-lt"
添加定制应用
1.创建用户应用:
要创建新的用户应用,请使用 petalinux-create 命令:
cd <plnx-proj-root>
$ petalinux-create -t apps --template <TYPE> --name <user-application-name> --enable
例如,要创建名为 myapp 的 C 语言应用:
petalinux-create -t apps --template c --name myapp --enable
2.修改应用源代码:
导航到新创建的应用目录,并按需编辑源文件:
cd <plnx-proj-root>/project-spec/meta-user/recipes-apps/myapp
您应该会看到以下 PetaLinux 模板生成的文件:
myapp.c/myapp.cpp:您可编辑此文件,或者将其替换为您的应用的实际源代码。
petalinuxbsp.conf:如果您要使用构建工件来搭配第三方实用工具进行调试,请添加以下行:
RM_WORK_EXCLUDE += "myapp"
注释:如果您删除应用目录,则还需要从 userrootfsconfig 移除 CONFIG_myapp 行,以避免错误。
若要创建 C++ 应用模板,请传递 --template c++ 选项,如下所示:
petalinux-create apps --template c++ --name myapp --enable
新的应用程序源文件可在 <plnx-proj-root>/project-spec/meta-user/recipes-apps/myapp 目录内找到。
cd <plnx-proj-root>/project-spec/meta-user/recipes-apps/myapp
您应该会看到以下 PetaLinux 模板生成的文件:
注释:您可在 ${TMPDIR}/work/<arch>/myapp/1.0./r0/ 下找到所有构建工件
您可编辑 myapp.c/myapp.cpp 文件或者将其替换为您的应用的实际源代码。如果您后续想要修改自己的自定义用户应用,则应编辑此文件。
注意!如果不再需要该应用目录,您可将其删除。您还必须移除以下行,因为删除该目录但保留该行会导致程序抛出错误。
<plnx-proj-root>/project-spec/meta-user/conf/userrootfsconfig 里的 CONFIG_myapp
在根文件系统中添加包:
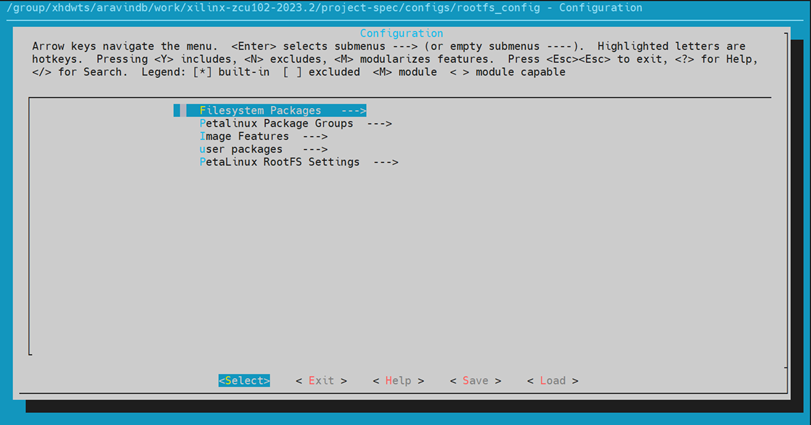
1.使用 PetaLinux 配置:
petalinux-config -c rootfs
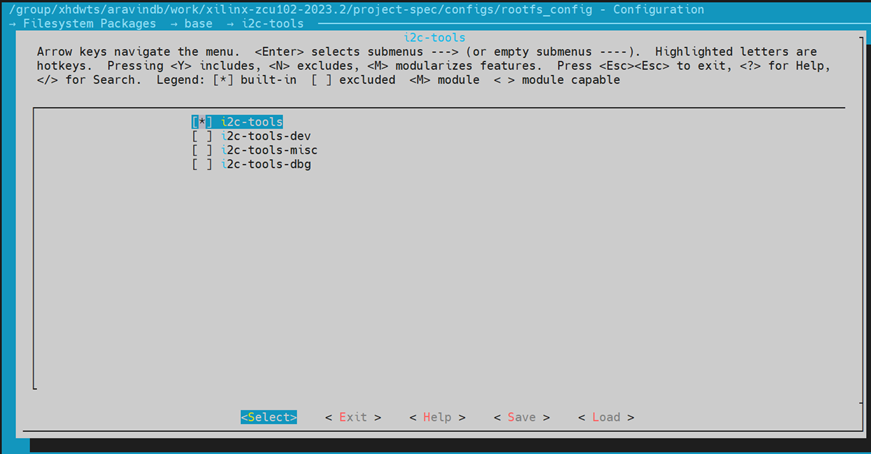
Filesystem Packages ---> base ---> i2c-tools ---> [*] i2c-tools
以下截屏可供参考:

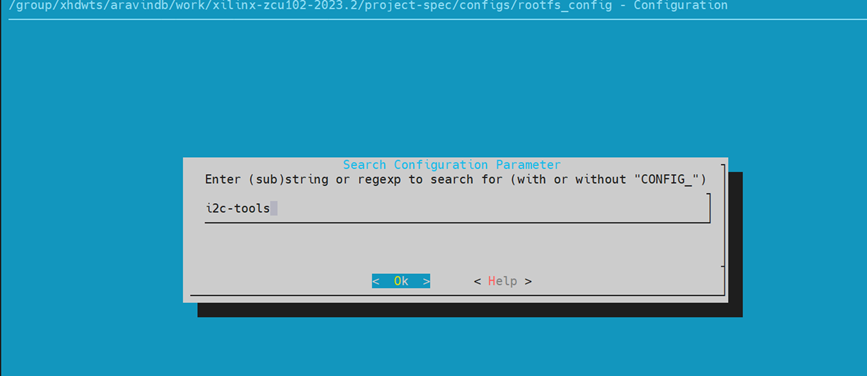
您还可以搜索任意包并将其启用,如下所示:


保存并退出。
2.手动添加:
如果此包在 petalinux-config -c rootfs 菜单中不可用,您可将其手动添加到 user-rootfsconfig 文件中。
您需要在现有层中找到配方名称并将其启用,如下所示。
如果要在 rootfs 中添加“fio”,需要在以下的 PetaLinux 层中检查配方:
components/yocto/layers/meta-openembedded/meta-oe/recipes-benchmark/fio/fio_3.32.bb,然后将其添加到以下文件中:project-spec/meta-user/conf/user-rootfsconfig
示例:
vim project-spec/meta-user/conf/user-rootfsconfig
每行单独添加一个包:
CONFIG_libserialport
CONFIG_fio
CONFIG_gpio-demo
CONFIG_peekpoke
CONFIG_openamp-remote
CONFIG_rpmsg-echo-test
CONFIG_audit
在根文件系统中启用相应的包:
petalinux-config -c rootfs
user packages ---> [*] fio
petalinux-build