作者:默宸,来源:FPGA技术联盟
双核运行原理
ZYNQ是一种主从关系的AMP架构,通过松散耦合共享资源,允许两个处理器同时运行自己的操作系统或者裸机应用程序,在各自运行自己的程序或者系统的时候,可以通过共享内存进行双核之间的交互。双核启动中,cpu0完成系统的初始化,与cpu1进行通信,读写共享内存。
共享资源防止冲突
1. DDR的内存使用,CPU0使用内存地址为0x00100000-0x001fffff,CPU1的使用地址应该避开这段地址,使用地址设为0x00200000-0x003fffff;
2. CPU1不使用L2内存,仅仅CPU0使用;
3. CPU1从核心在PL的中断路由到PPI控制器,通过使用PPI将中断路由到核心,而CPU0通过ICD路由到核心;
4. 当CPU0访问共享内存的时候,CPU1不访问,同理,CPU1访问共享内存的时候,CPU0不访问。
双核运行的过程
ZYNQ是一个可扩展平台,就是有FPGA作为外设的A9双核处理器,它的启动流程与FPGA完全不同,而与传统的ARM处理器类似,ZYNQ的启动配置需要多个处理步骤,通常情况,需要包含以下3个阶段:
1. 阶段1:在芯片上电运行后,处理器自动开始stage0-boot,就是片内的BOORROM中的代码,上电复位或者热复位后,处理器执行不可修改的代码;
2. 阶段2:BOORROM初始化CPU和一些外设后,读取下一个阶段所需的程序代码FSBL(first stage boot loader),它是可以由用户修改控制的代码;
3. 阶段3:这是用户基于BSP(板级支持包),也可以是操作系统的启动引导程序,这个阶段完全是在用户的控制下实现的。
系统上电启动后,第0阶段启动代码判断启动模式,将第一阶段启动代码FSBL下载到DDR中并且执行。FSBL会配置硬件比特流文件,加载CPU0可执行文件和CPU1可执行文件到DDR对应的链接地址,在这一阶段,所有代码在CPU0中执行,在执行CPU0程序的时候,把CPU1上将要执行的应用程序执行地址写入到OCM的0xFFFFFFF0地址,然后执行 SEV汇编指令,激活CPU1,CPU1激活后,将会到OCM的0xFFFFFFF0地址读取其数值,其数值就是CPU1执行可执行程序的地址,CPU1将从该地址执行。
双核运行的配置
建立工程的区别
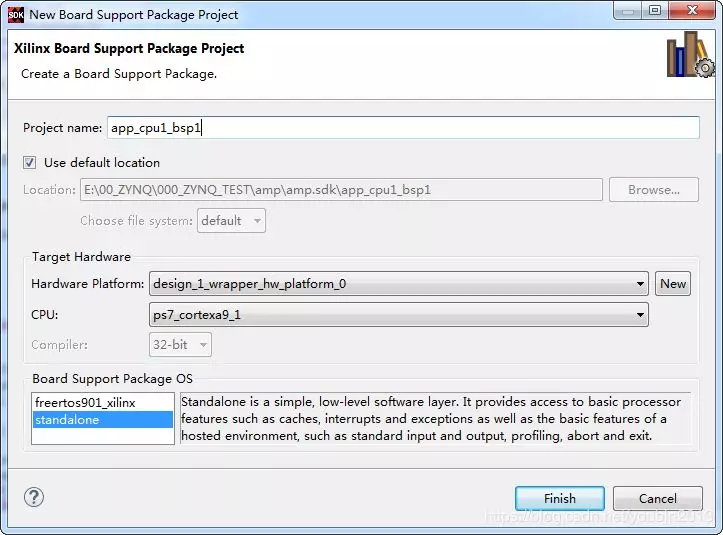
核0建立工程和以前一样,但是核1建立工程与以前不同,需要单独建立一个板级支持包bsp。建立CPU1的板级支持包步骤:
1. 在SDK主界面主菜单下,选择File->New->Board Support Package;
2. 出现“New Board Support Package Project”对话框,如图1所示;

图1 新建cpu1板级支持包
点击finish建立好支持包后,出现“Board Support Package Settings”对话框,在界面左侧窗口中,展开Overview,在展开项中,找到并展开drivers,找到ps_cortexa9_1,并选择它;
在右侧的Configuration for OS界面中,找到名字为extra_compiler_flags一行,将其对应的Value一列的值改为-g –DUSE_AMP_ = 1,如图2所示;

图2 板级开发包的属性设置
建立好板级开发包后,建立cpu1的sdk工程,该工程的配置与和0也有不同,就是在新建工程对话框的参数配置要与核0不同,其核心选择核心1,板级支持包选择刚刚建立的cpu1的板级支持包(proccessor:ps7_cortexa9_1;Borad Support Package:app_cpu1_bsp),建立好双核的应用工程和板级开发包后,进行软件的设计。
软件设计
1. cpu0的软件,在fsbl启动cpu0程序后,其程序需要增加启动cpu1的流程代码;
2. cpu0和cpu1的软件需要有一片共享内存,该内存不能被cache化;
3. 通过共享内存的分时访问,设计两个cpu的程序流程。
增加启动cpu1的代码如下:
#define sev() __asm__("sev")
#define CPU1STARTADDR 0xFFFFFFF0
#define CPU1STARTMEM 0x10000000
void StartCpu1(void)
{
Xil_Out32(CPU1STARTADDR,CPU1STARTMEM);
dmb();
sev();
}
禁用共享内存的代码:
#define COMM_VAL (*(volatile unsigned long *)(0xffff0000))
Xil_SetTlbAttributes(0xffff0000,0x14de2);
双核源码与测试
利用共享内存做通讯的例子
Cpu0代码:
#include "stdio.h"
#include "xil_io.h"
#include "xil_mmu.h"
#include "xil_exception.h"
#include "xpseudo_asm.h"
#include "sleep.h"
#define COMM_VAL (*(volatile unsigned long *)(0xffff0000))
#define sev() __asm__("sev")
#define CPU1STARTADDR 0xFFFFFFF0
#define CPU1STARTMEM 0x10000000
void StartCpu1(void)
{
Xil_Out32(CPU1STARTADDR,CPU1STARTMEM);
dmb();
sev();
}
int main(void)
{
Xil_SetTlbAttributes(0xffff0000,0x14de2);
StartCpu1();
COMM_VAL = 0;
while(1)
{
print("CPU0:hello world CPU0\r\n");
sleep(2);
COMM_VAL = 1;
while(COMM_VAL == 1);
}
return 0;
}
Cpu1代码:
#include "stdio.h"
#include "xil_io.h"
#include "xil_mmu.h"
#include "xil_exception.h"
#include "xpseudo_asm.h"
#include "xparameters.h"
#include "sleep.h"
#define COMM_VAL (*(volatile unsigned long *)(0xffff0000))
int main(void)
{
Xil_SetTlbAttributes(0xffff0000,0x14de2);
while(1)
{
while(COMM_VAL == 0);
print("CPU1:hello world CPU1\r\n");
sleep(2);
COMM_VAL = 0;
}
return 0;
}
测试结果:
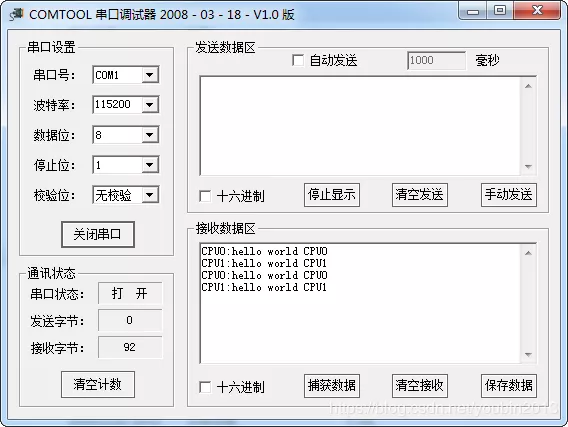
将上述程序生成boot.bin文件,然后下载到flash,启动后通过串口助手可以收到cpu0与cpu1的打印信息,每间隔两秒打印一次,如图3所示。

图3 程序测试
利用软件中断做通讯的例子
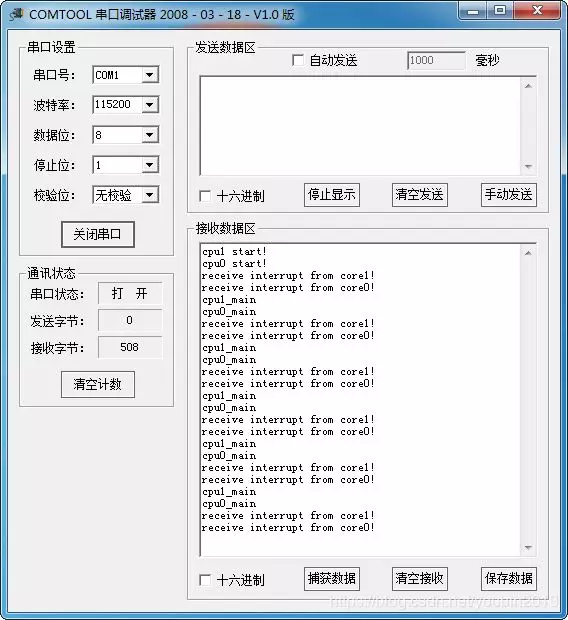
该例子中,cpu0和cpu1都注册两个软件中断,将1号软件中断注册给cpu1,表示cpu0发送中断给cpu1,将2号软件中断注册给cpu0,表示cpu1发送中断给cpu0;然后在程序运行时,cpu0触发1号软件中断,此时cpu1正在运行主程序被该中断中断,进入中断服务函数,其处理完中断后触发2号软件中断,此时该中断会中断cpu0,进入中断服务函数,cpu0处理完中断后回到主函数,再触发1号软件中断,往复运行。
Cpu0代码:
/*
* app_cpu0.c
*
* Created on: 2019年3月27日
* Author: dz
*/
#include "xil_cache.h"
#include "xparameters.h"
#include "xil_mmu.h"
#include "xil_misc_psreset_api.h"
#include "xil_exception.h"
#include "xscugic.h"
#include "xuartps.h"
#include "stdio.h"
#include "sleep.h"
volatile u8 software_intr_received = 0;
#define CORE0_TO_CORE1_INTR_ID 0x01
#define CORE1_TO_CORE0_INTR_ID 0x02
void sys_intr_init(void);
void Setup_Intr_Exception(XScuGic * IntcInstancePtr);
void Scu_Intr_Init(XScuGic* IntancePtr,int Scu_Int_ID);
void Init_Software_Intr(XScuGic *GicInstancePtr, Xil_InterruptHandler IntrHanedler, u16 SoftwareIntrId, u8 CpuId);
void Gen_Software_Intr(XScuGic *GicInstancePtr, u16 SoftwareIntrId, u32 CpuId);
void Cpu0_Intr_Hanedler(void *Callback);
void Cpu1_Intr_Hanedler(void *Callback);
XScuGic ScuGic;
void delay(unsigned int count)
{
int i = 0;
for(i = 0;i < count;i++) ;
}
int main(void)
{
sys_intr_init();
xil_printf("cpu0 start!\r\n");
while(1)
{
if(XPAR_CPU_ID == 0)
Gen_Software_Intr(&ScuGic, CORE0_TO_CORE1_INTR_ID, XSCUGIC_SPI_CPU1_MASK);
/*Gen_Software_Intr(&ScuGic, CORE0_TO_CORE1_INTR_ID, XSCUGIC_SPI_CPU0_MASK);*/
else
Gen_Software_Intr(&ScuGic, CORE1_TO_CORE0_INTR_ID, XSCUGIC_SPI_CPU0_MASK);
delay(200000000);
if(1 == software_intr_received)
{
xil_printf("cpu0_main\r\n");
software_intr_received = 0;
}
}
return 0;
}
void sys_intr_init(void)
{ Scu_Intr_Init(&ScuGic,XPAR_SCUGIC_SINGLE_DEVICE_ID);
// if(XPAR_CPU_ID == 0)
Init_Software_Intr(&ScuGic, Cpu0_Intr_Hanedler, CORE0_TO_CORE1_INTR_ID, 0);
// else
Init_Software_Intr(&ScuGic, Cpu1_Intr_Hanedler, CORE1_TO_CORE0_INTR_ID, 1);
Setup_Intr_Exception(&ScuGic);
}
void Setup_Intr_Exception(XScuGic * IntcInstancePtr)
{
//connect hardware interrupt
Xil_ExceptionInit();
Xil_ExceptionRegisterHandler(XIL_EXCEPTION_ID_INT,(Xil_ExceptionHandler)XScuGic_InterruptHandler,(void *)IntcInstancePtr);
//enable hardware interrupt
Xil_ExceptionEnable();
}
void Scu_Intr_Init(XScuGic* IntancePtr,int Scu_Int_ID)
{
XScuGic_Config *ScuConfigPtr;
//find device
ScuConfigPtr = XScuGic_LookupConfig(Scu_Int_ID);
//config scuint
XScuGic_CfgInitialize(IntancePtr, ScuConfigPtr,ScuConfigPtr->CpuBaseAddress);
}
void Cpu0_Intr_Hanedler(void *Callback)
{
xil_printf("receive interrupt from core1!\r\n");
software_intr_received = 1;
}
void Cpu1_Intr_Hanedler(void *Callback)
{
xil_printf("receive interrupt from core0!\r\n");
software_intr_received = 1;
}
void Init_Software_Intr(XScuGic *GicInstancePtr, Xil_InterruptHandler IntrHanedler, u16 SoftwareIntrId, u8 CpuId)
{
int Status;
// XScuGic_SetPriorityTriggerType(GicInstancePtr, SoftwareIntrId, 0xB0, 0x2);
XScuGic_SetPriorityTriggerType(GicInstancePtr, SoftwareIntrId, 0xd0, 0x3);
Status = XScuGic_Connect(GicInstancePtr, SoftwareIntrId,
(Xil_InterruptHandler)IntrHanedler, NULL);
if (Status != XST_SUCCESS) {
xil_printf("core%d: interrupt %d set fail!\r\n", XPAR_CPU_ID, SoftwareIntrId);
return;
}
XScuGic_InterruptMaptoCpu(GicInstancePtr, CpuId, SoftwareIntrId); //map the the Software interrupt to target CPU
XScuGic_Enable(GicInstancePtr, SoftwareIntrId);//enable the interrupt for the Software interrupt at GIC
}
void Gen_Software_Intr(XScuGic *GicInstancePtr, u16 SoftwareIntrId, u32 CpuId)
{
int Status;
Status = XScuGic_SoftwareIntr(GicInstancePtr, SoftwareIntrId, CpuId);
if (Status != XST_SUCCESS) {
xil_printf("core%d: interrupt %d gen fail!\r\n", XPAR_CPU_ID, SoftwareIntrId);
return;
}
}
Cpu1代码:
/*
* app_cpu0.c
*
* Created on: 2019年3月27日
* Author: dz
*/
#include "xil_cache.h"
#include "xparameters.h"
#include "xil_mmu.h"
#include "xil_misc_psreset_api.h"
#include "xil_exception.h"
#include "xscugic.h"
#include "xuartps.h"
#include "stdio.h"
#include "sleep.h"
volatile u8 software_intr_received = 0;
#define CORE0_TO_CORE1_INTR_ID 0x01
#define CORE1_TO_CORE0_INTR_ID 0x02
void sys_intr_init(void);
void Setup_Intr_Exception(XScuGic * IntcInstancePtr);
void Scu_Intr_Init(XScuGic* IntancePtr,int Scu_Int_ID);
void Init_Software_Intr(XScuGic *GicInstancePtr, Xil_InterruptHandler IntrHanedler, u16 SoftwareIntrId, u8 CpuId);
void Gen_Software_Intr(XScuGic *GicInstancePtr, u16 SoftwareIntrId, u32 CpuId);
void Cpu0_Intr_Hanedler(void *Callback);
void Cpu1_Intr_Hanedler(void *Callback);
XScuGic ScuGic;
void delay(unsigned int count)
{
int i = 0;
for(i = 0;i < count;i++)
;
}
int main(void)
{
sys_intr_init();
// Gen_Software_Intr(&ScuGic, CORE1_TO_CORE0_INTR_ID, XSCUGIC_SPI_CPU1_MASK);
xil_printf("cpu1 start!\r\n");
while(1)
{
if(1 == software_intr_received)
{
software_intr_received = 0;
if(XPAR_CPU_ID == 0)
Gen_Software_Intr(&ScuGic, CORE0_TO_CORE1_INTR_ID, XSCUGIC_SPI_CPU1_MASK);
/* Gen_Software_Intr(&ScuGic, CORE0_TO_CORE1_INTR_ID, XSCUGIC_SPI_CPU0_MASK);*/
else
Gen_Software_Intr(&ScuGic, CORE1_TO_CORE0_INTR_ID, XSCUGIC_SPI_CPU0_MASK);
delay(200000000);
xil_printf("cpu1_main\r\n");
}
}
return 0;
}
void sys_intr_init(void)
{ Scu_Intr_Init(&ScuGic,XPAR_SCUGIC_SINGLE_DEVICE_ID);
// if(XPAR_CPU_ID == 0)
Init_Software_Intr(&ScuGic, Cpu0_Intr_Hanedler, CORE0_TO_CORE1_INTR_ID, 0);
// else
Init_Software_Intr(&ScuGic, Cpu1_Intr_Hanedler, CORE1_TO_CORE0_INTR_ID, 1);
Setup_Intr_Exception(&ScuGic);
}
void Setup_Intr_Exception(XScuGic * IntcInstancePtr)
{
//connect hardware interrupt
Xil_ExceptionInit();
Xil_ExceptionRegisterHandler(XIL_EXCEPTION_ID_INT,(Xil_ExceptionHandler)XScuGic_InterruptHandler,(void *)IntcInstancePtr);
//enable hardware interrupt
Xil_ExceptionEnable();
}
void Scu_Intr_Init(XScuGic* IntancePtr,int Scu_Int_ID)
{
XScuGic_Config *ScuConfigPtr;
//find device
ScuConfigPtr = XScuGic_LookupConfig(Scu_Int_ID);
//config scuint
XScuGic_CfgInitialize(IntancePtr, ScuConfigPtr,ScuConfigPtr->CpuBaseAddress);
}
void Cpu0_Intr_Hanedler(void *Callback)
{
xil_printf("receive interrupt from core1!\r\n");
software_intr_received = 1;
}
void Cpu1_Intr_Hanedler(void *Callback)
{
xil_printf("receive interrupt from core0!\r\n");
software_intr_received = 1;
}
void Init_Software_Intr(XScuGic *GicInstancePtr, Xil_InterruptHandler IntrHanedler, u16 SoftwareIntrId, u8 CpuId)
{
int Status;
XScuGic_SetPriorityTriggerType(GicInstancePtr, SoftwareIntrId, 0xB0, 0x2);
// XScuGic_SetPriorityTriggerType(GicInstancePtr, SoftwareIntrId, 0xd0, 0x3);
Status = XScuGic_Connect(GicInstancePtr, SoftwareIntrId,
(Xil_InterruptHandler)IntrHanedler, NULL);
if (Status != XST_SUCCESS) {
xil_printf("core%d: interrupt %d set fail!\r\n", XPAR_CPU_ID, SoftwareIntrId);
return;
}
XScuGic_InterruptMaptoCpu(GicInstancePtr, CpuId, SoftwareIntrId); //map the the Software interrupt to target CPU
XScuGic_Enable(GicInstancePtr, SoftwareIntrId);//enable the interrupt for the Software interrupt at GIC
}
void Gen_Software_Intr(XScuGic *GicInstancePtr, u16 SoftwareIntrId, u32 CpuId)
{
int Status;
Status = XScuGic_SoftwareIntr(GicInstancePtr, SoftwareIntrId, CpuId);
if (Status != XST_SUCCESS) {
xil_printf("core%d: interrupt %d gen fail!\r\n", XPAR_CPU_ID, SoftwareIntrId);
return;
}
}
将上述程序生成boot.bin文件,然后下载到flash,启动后通过串口助手可以收到cpu0与cpu1的打印信息,每间隔两秒打印一次,如图4所示。

图4 测试结果