作者:Grace Sun,AMD赛灵思开发者
在Vitis AI 2.5的vitis-ai-pytorch 和vitis-ai-tensoflow2 conda环境中,引入了一个名为inspector的新功能,用户可以在做量化前调用inspector来检查浮点模型。Inspector根据指定的DPU目标架构,会诊断并显示神经网络的分区结果(映射到CPU还是DPU),并提示有关层未映射到DPU的原因。
本文以vitis-ai-pytorch环境为例,描述了Inspector的用法并给出示例。
Inspector的python编程并不复杂,Vitis AI 2.5 github的vai_q_pytorch example里就给出了如何在模型量化文件中嵌入inspector的代码示例:
概况来说,应用此功能有三步:
导入Inspector模块
from pytorch_nndct.apis import Inspector
创建以DPU name或fingerprint为目标的inspector
inspector = Inspector("0x603000b16013831") # by target fingerprint
or
inspector = Inspector("DPUCAHX8L_ISA0_SP") # by target name
对浮点模型做检查
input = torch.randn([batch_size, 3, 224, 224])
inspector.inspect(model, input)
其中Inspector模块在以下python文件中定义:
https://github.com/Xilinx/Vitis-AI/blob/master/src/Vitis-AI-Quantizer/vai_q_pytorch/pytorch_binding/pytorch_nndct/apis.py#L156
class Inspector():
def __init__(self, name_or_fingerprint: str):
在创建Inspector对象时,需要指定目标硬件name或者fingerprint,其对应的有效值列举如下:
DPUCADF8H_ISA0=>0x700000000000000,
DPUCAHX8H_ISA2=>0x20200000010002a,
DPUCAHX8H_ISA2_DWC=>0x20200000010002b,
DPUCAHX8H_ISA2_ELP2=>0x20200000000002e,
DPUCAHX8L_ISA0=>0x30000000000001d,
DPUCAHX8L_ISA0_SP=>0x30000000000101d,
DPUCVDX8G_ISA3_C32B1=>0x603000b16011811,
DPUCVDX8G_ISA3_C32B3=>0x603000b16011831,
DPUCVDX8G_ISA3_C32B3_PSMNET=>0x603000b16026831,
DPUCVDX8G_ISA3_C32B6=>0x603000b16011861,
DPUCVDX8G_ISA3_C64B1=>0x603000b16011812,
DPUCVDX8G_ISA3_C64B3=>0x603000b16011832,
DPUCVDX8G_ISA3_C64B5=>0x603000b16011852,
DPUCVDX8H_ISA1_F2W2_8PE=>0x501000000140fee,
DPUCVDX8H_ISA1_F2W4_4PE=>0x5010000001e082f,
DPUCVDX8H_ISA1_F2W4_6PE_aieDWC=>0x501000000160c2f,
DPUCVDX8H_ISA1_F2W4_6PE_aieMISC=>0x5010000001e082e,
DPUCZDI4G_ISA0_B4096_DEMO_SSD=>0x400002003220206,
DPUCZDI4G_ISA0_B8192D8_DEMO_SSD=>0x400002003220207,
DPUCZDX8G_ISA1_B1024=>0x101000016010402,
DPUCZDX8G_ISA1_B1152=>0x101000016010203,
DPUCZDX8G_ISA1_B1600=>0x101000016010404,
DPUCZDX8G_ISA1_B2304=>0x101000016010405,
DPUCZDX8G_ISA1_B3136=>0x101000016010406,
DPUCZDX8G_ISA1_B4096=>0x101000016010407,
DPUCZDX8G_ISA1_B512=>0x101000016010200,
DPUCZDX8G_ISA1_B800=>0x101000016010201
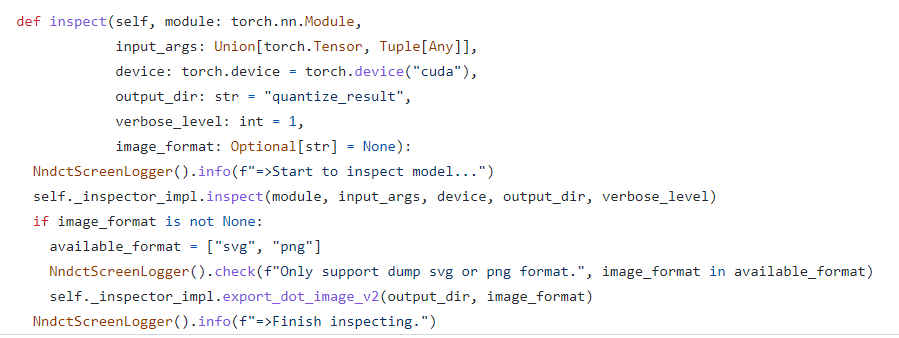
inspect函数定义及源码如下:
https://github.com/Xilinx/Vitis-AI/blob/master/src/Vitis-AI-Quantizer/vai_q_pytorch/pytorch_binding/pytorch_nndct/hardware/inspector.py
参数释义:
module: 待部署的浮点模型
input_args: 输入tensor,形状与浮点模型的真实输入一致,但取值可以是随机数
device:在GPU或CPU上运行
output_dir: inspection结果所存储的文件夹
verbose_level: 控制屏幕上显示的检查结果的详细程度。 默认值为1。
0:关闭打印检查结果
1:打印分配给CPU的operator汇总报告
2:打印所有operator的设备分配汇总报告
image_format: 导出可视化的结果,默认值是none,也就是只生成.txt和.gv文件。可以支持png和svg图像格式。
以下python脚本是一个简单的Inspector用法示例,检查对象是torchvision 预训练的inception_v3浮点模型。(见附件)
将此脚本拷贝至Vitis-AI repo clone的目录下,以确保在docker环境下可见。这里我们拷贝到Vitis-AI/pt_inspector_ex。按照下面的步骤运行脚本:
1. 根据机器上安装的Vitis AI 2.5 docker image tag,启动Vitis AI 2.5 docker环境,例如:

2. 启动vitis-ai-pytorch conda环境

3. 下载预训练的inception_v3浮点模型,放到docker内可见的文件夹,这里我们放在和python脚本同一个位置。
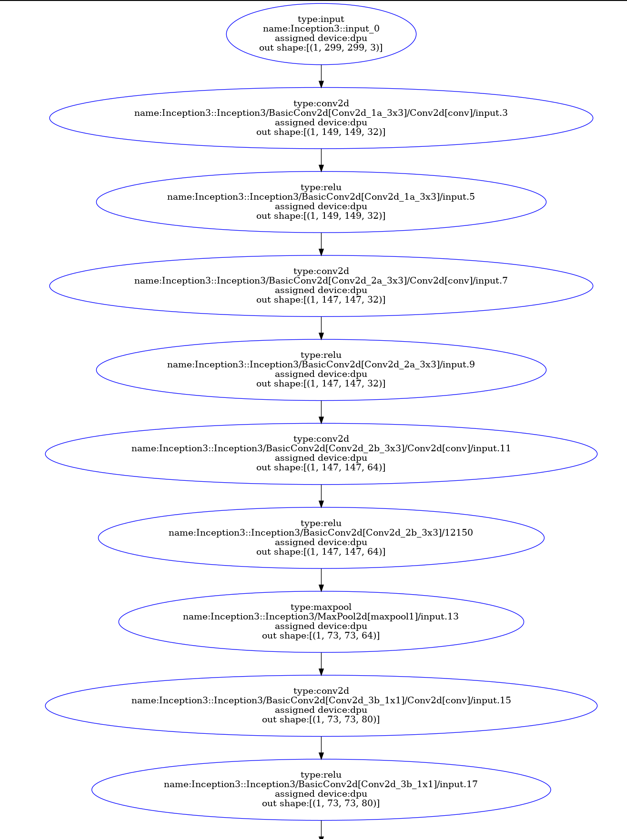
 4. 运行脚本,其中--model_dir必须设置或者在脚本中修改,其他可以用缺省值。这里我们用DPUCZDX8G_ISA1_B4096为硬件目标进行检查,将检查结果存放在当前的inspect文件夹下,并导出png图像格式。
 运行结果打印如下:
 可以看到,诊断结果是所有的operator都分配到了DPU,也就是DPU均支持。
inspect/inspect_DPUCZDX8G_ISA1_B4096.txt提供了神经网络的各层细节。
以下摘取了conv2d的一部分summary,
各项汇总的含义在txt的头部注释中有解释:
# Field Description:
# target info: target device information.
# inspection summary: summary report of inspection# graph name: The name of graph representing of the NN model.
# node name: The name of node in graph.
# input nodes: The parents of the node.
# output nodes: The children of node.
# op type: The type of operation.
# output shape: The shape of node output tensor(Data layout follows XIR requirements).
# op attributes: The attributes of operation.(The description is consistent with that of XIR)
# assigned device: The device type on which the operation execute.
# hardware constrains: If the operation is assigned to cpu. This filed will give some hits about why the DPU does not support this operation.
# node messages: This filed will give some extra information about the node.(For example, if quantizer need to insert a permute operation to convert data layout from 'NCHW' to 'NHWC' or from 'NCHW' to 'NHWC' for deployment. This message will be add to node_messages.)
# source range: points to a source which is a stack track and helps to find the exact location of this operation in source code.
打开导出的png图像,也可以按需进行查看。以下仍为截取的一小部分:
Inspector功能在将来的Vitis AI版本中一定会持续改善。建议在量化前利用好这个工具对浮点模型做一遍检查,根据生成的检测报告,用户可预先了解哪些operator会被分配到CPU,有助于提前修改或优化神经网络模型,从而降低部署难度和时间。